In the previous blog, I discussed the first 3 steps that will help to ensure a successful outcome in projects that use natural stone. In this article, I will cover the next 3 key steps.

As a quick recap, the first three steps were:
1. Defining the Requirements
 Understand the environment that the stone is going into and what it will have to withstand: e.g. consider slip resistance, frost resistance, wearability etc. Ensure that a CE certificate is available for the stone - you could be breaking the law without one.
2. Selection of Stone
See enough samples to know what variation is likely to be in the delivered batch.
3. Preparation of the Substrate
Ensure that the substrate (walls and/or floor base) is stable. Shifting substrates lead to cracked tiles and grout.

At the recent Stone Federation training day, the second half of my presentation covered the actual installation, sealing and ongoing maintenance of the stone.
Here's a summary of the second half of my presentation:
4. Installation of Natural Stone
Anti-fracture matting:
The previous blog mentioned anti-fracture matting which can help to prevent hairline cracks that are caused when there is movement in the substrate. The movement is often caused by thermal expansion and contraction but can also be caused by instability in wooden joists and floorbaords.
Anti-fracture matting helps to isolate the tiles from this movement. There are a couple of types of matting that work in slightly different ways.
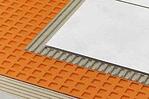
The best known is Schluter's Ditra Mat which is composed of two layers connected by fibres, the bottom layer is a thin fibre layer and the upper layer is made of plastic pockets. In total, the thickness is around 5mm. The lower layer is adhered to the substrate with a flexible S1 adhesive and the tiles are adhered to the top layer. The fibres allow the lower layer to move slightly without the movement being transmitted up to the upper layer. There are a number of other similar systems that use the plastic pockets.
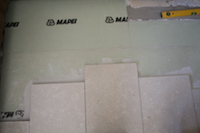 The other type is Mapei's Mapetex which is a 1mm thick non-woven fleece. This is adhered to the substrate with a "S2" flexible adhesive and then the tiles are adhered on top using a "S1" adhesive. The combination of S2 adhesive with the matting then prevents any slight lateral movement in the substrate from being transferred up to the tiles. The main advantage of this type of matting is that it is thinner than the pocketed matting and it uses a lot less adhesive as there are no pockets that have to be filled. Mapei's Keraquick is "S1" flexible but can be made extra flexible (to "S2" level) by using Mapei Latex Plus instead of water to mix it.
Adhesives and Grouts:
We always use white S1 flexible adhesives. Mapei's Keraquick is our preferred brand as we can count on excellent technical help from Mapei. The polymer modified flexible adhesive gives added protection against hairline cracks from substrate movement and the white colour (or absence of pigment) helps to prevent staining to natural stone from any grey pigment that would be in a grey adhesive.
Also, the grouts should be flexible to cope with any slight movement from the substrate or from thermal expansion.
Installation Sequence:
It is important when fixing natural stone to follow the process:
1: Lay the stone tiles/slabs
2: Clean with ph neutral detergent such as Fila Cleaner and rinse with clean water.
This is a crucial and often overlooked step in the installation process. It is to remove any residues left on the stone from the processing at the factory and any dirt and adhesive from the laying process. It allows the sealer to be absorbed fully and evenly.
3: Allow the stone to dry fully and then apply a generous first coat of sealer removing any excess before it dries on the surface.
4: Allow the sealer to dry fully and then grout the tiles.
5: Clean with ph neutral detergent and rinse.
6: Allow to dry fully and then apply a second coat of sealer.
 7: Test that the stone is adequately sealed by carrying out a "water droplet" test. Splash a little clean water onto the floor. If the droplets soak into the stone, apply a further coat of sealer. If the water "beads" on the surface, the floor is adequately sealed.
8: Wax if required. Apply two coats of wax.
5. Sealing Natural Stone
The key to sealing natural stone, apart from using a good quality sealer, is to ensure that the floor is properly clean and dry before applying the sealer regardless of the type of sealer.
Impregnators or topical (surface) sealers? The topical sealers lay on the surface of the stone, similar to a varnish, and act as a barrier to prevent liquids from coming into contact with the stone. In simple terms, the impregnators act by soaking into the stone and forming a protective barrier inside the stone.
The disadvantages of using a topical sealer is that the sealer can wear off leaving the stone unprotected. They also leave a visible finish on the surface, similar to a varnish or a wax. For these reasons, we prefer not to the use topical sealers.
Solvent or water based sealers? At the moment, in my personal opinion, solvent based sealers outperform the water based sealers but the water based ones are catching up and they do have one significant advantage.
For solvent based sealers to be effective, the stone has to be completely dry, not just surface dry. If there is any moisture left in the stone (or grout), the sealer will be repelled by the moisture.
The big advantage of water based sealers is that they can be applied with some residual moisture in the stone - i.e. the stone doesn't have to be totally dry. This means that the tiler can complete the job more quickly as the required drying time is considerably shorter.
In future, I can foresee that health and safety regulations will ban the use of solvent sealers and we will have to use water based ones.
6. Maintenance of Natural Stone
The key to successful maintenance of natural stone is to use a cleaner that works in harmony with the sealer. So, in most cases, use a ph neutral cleaner. Ideally, choose one that is made by the sealer company and guaranteed not to harm or degrade the stone or the sealer itself.
The general household cleaners that are available in supermarkets should be avoided as these are likely to contain acids or bleaches which damage the stone and the sealers. They will probably also contain waxes or silicones which will leave a residue on the surface of the stone and make it harder to keep the stone clean in the long term.
In summary, a successful natural stone project requires good team work all the way from the cutting of the blocks in the quarry and the processing and finishing of the stone through to the installation and maintenance of the finished product. It needs every link in the whole sequence to work correctly for the project to be as successful as the client wants it to be.
****************
Was that useful? If you have any questions on any of the content of this (or any other blog post), please call or email. I'm always happy to hear from you.
If you haven't done so already, subscribe by entering your email address into the box at the bottom of this page. We'll send the next blog direct to your inbox.
****************
If you would like to know more about how we can help to make your natural stone project as successful as it possibly can be, please download our brochure or just phone or email for a chat. We're always happy to talk about natural stone!

Thanks for reading.
Steve
Tel: 0345 260 8070
Email: steve @ amarestone.com
P.S. We welcome your feedback and comments below. Is there a natural stone topic you would like us to cover? Tell us here and we will do our best.