For many interior designers, architects and private clients, the decision to use marble or limestone can represent their design statement as well as a financial investment so it is not surprising that they can be a little anxious to ensure that the project is a success.
The key to the success of the project is choosing the right type of natural stone for the environment in which it will be used and then having it installed correctly so that it looks its best for many years to come. Even a top quality stone can be ruined by a poor installation.
I was recently asked to present my views to members of the Stone Federation of Great Britain at one of their training days. My presentation can be split into 6 main highlights and I have included the first three of them here. The other three will be published in my next blog.

1. Defining the Requirements
2. Selection of Stone
3. Preparation of the Substrate
To be included in the next blog:
4. Installation of Natural Stone
5. Cleaning and Sealing Natural Stone
6. Maintenance of Natural Stone
1: Defining the Requirements
It sounds obvious but this first stage is often overlooked. It is easy to get carried away with the look of a particular stone without paying attention to the environment or function that it will be put to. It is worth prioritising your requirements into "MUST" haves and "LIKE" to haves. Discuss these with your supplier.
A few questions to consider are:
a) Is the stone CE certified?
Since 1st July 2013, it has been a legal requirement for all construction products placed onto the market in the EU (and UK) to have been tested and to be supplied with a CE Certificate and Declaration of Performance. This law also applies to the supply of natural stone. The CE certificate describes the tests that the stone has undergone and the results of those tests. The results help to determine whether the stone is fit for purpose and specifically says where the stone originates from. The presence of a CE certificate, in itself, does not automatically mean that the stone is fit for purpose, it simply means that it has been tested. The results can then be interpreted to determine if the stone is fit for purpose.
This requirement should be the first in your list of "MUST" haves.
[Note: there is also a "China Export" mark which looks confusingly similar to the European CE mark. Please do not confuse the two. The China Export mark means only that the product has passed through China. China released their version of the CE stamp around the same time as the European mark. Coincidence? maybe not.]
b) How quickly do you need a delivery?
There may be a lead time to get the stone shipped from the quarry. Your supplier should make you aware of this. Unless you are choosing one of the common limestones or travertines that are imported in vast quantities into the UK, it is unlikely that the type of stone, size and finish are kept in stock for immediate delivery.
c) Does the stone have to be frost proof?
Any stone used externally in the UK ought to be able to withstand the British winter. Therefore, it will have to be frost resistant. However, there are different degrees of frost resistance and some stone will withstand the cold better or worse than others. Wall cladding is less susceptible to frost damage than flooring (patio) stone and, of course, different regions around the UK are prone to different weather patterns.
d) Does it have to be non-slip?
e.g. for use in wet areas such as bathrooms, pool surrounds or patios. Most natural stone can be textured in a variety of different ways to create a slip-resistant surface. The actual techniques used depends upon the equipment that the quarry's factory or the local stone processor has available. There's more on this in our earlier blog.
e) Is it important that it is hard-wearing?
It is fairly obvious that some stones are harder (i.e. more dense) than others and the density of the stone helps to determine how it is likely to wear over time. As a guideline, granite is the hardest of all and marbles tend to be harder than limestones but that is by no means always the case. There are limestones that are extremely hard wearing and can withstand the toughest treatment. For example, the French limestone, Rocheret, has been used on several of the UK's busiest railway platforms for years and is holding up very well.
The CE certificate will show the density of the stone and a good supplier will be able to interpret this to explain the relative merits of different stones.
There may be circumstances where a softer stone is perfectly adequate for a project and it doesn't require a particularly hard stone. It all depends upon the requirements of the particular application.
f) What is your budget?
If keeping to a fixed budget is a high priority, then it is best to make this clear right from the start. This may mean that you have to compromise on some of your other requirements. It will help if you make this clear to your supplier when you start your search.
2: Selection of Stone
It can be very difficult to get an accurate picture of what a large area of stone will look like from a small sample. Most suppliers will send out a 10x10cm sample piece but this should never be relied upon as a truly indicative sample.
The Stone Federation of GB recommends that you see a range of samples that represents the extremes of what is likely to arrive in your delivery. In fact, the best way to choose is to visit the quarry or the quarry's factory to view the full range. However, this is not always practical so a combination of photographs and larger samples will often have to suffice.
Many quarries will have "range" boards from their current production that demonstrates the variation in the stone and most of the quarries are happy to send photos out to your supplier. Check with your supplier to see if they have access to these photos.
Once you have chosen the stone, there are still more decisions to be made regarding tile size, layout, thickness and surface finish. As I mentioned above, different quarries have different equipment and this determines what sizes and finishes are possible.
The topics of tile size and layout and surface finishes are discussed in more detail in some of our previous blogs.
3: Preparation
There are two aspects to the preparation work prior to the installation of the stone. Firstly, the stone itself should be prepared and then the substrate needs to be properly prepared.
Preparation of the stone:
As soon as the stone is delivered, it should be checked to confirm that it is as expected. Provided you followed the advice above on the selection of stone, and your supplier is reliable, there should be no surprises at this stage.
Assuming that the stone is in the form of floor tiles, your installer should carefully remove the tiles from the crate and mix them up to ensure that light and dark ones, and more or less veined ones are randomly spread and not clustered into groups (unless that is look you specifically want to achieve).
Agree the setting out with your installer. Make sure that the tiles are to be laid in the way that you want them laid. An experienced tiler may have a view on how they are to be set out but ensure that you have agreed this in advance.
Double check that there are enough tiles to complete the job. A top-up delivery will take time to arrive and may not have come from the same batch.
Substrate Preparation:
This is key to ensuring the job is successful in the long-term. Any mistakes at this stage can be very costly and it is well worth getting expert advice to get this right.
Here are a few pointers on the key things to look out for with different types of substrate:
Sand and Cement screed:
Ensure it is dry (or use a moisture barrier, such as Mapetex). Typical drying times are 1 day per 1mm of screed thickness.
Check the levels - the surface of the screed has to be flat to allow the installer the best chance of making the top layer of tiles look neat and without lips.
The screed should be densely packed so it is not loose and crumbly.
Look for "day joins" often in doorways.
Cover all joins with an anti-fracture membrane. Areas larger than about 50 sqm or where there is a length of 8 linear metres should always be protected with an anti-fracture membrane to prevent cracks caused by thermal expansion and contraction.
Anhydrite screed:
These are usually recognised as "poured" screeds - e.g. Gyvlon. They give a nice level surface but require a little additional consideration:
Always allow to dry fully (typical drying time of 1 day per 1 mm of thickness).
Remove the laitance or "crust" when dry. This is a flaky layer which dries on top of the screed. If it is not removed before tiling, it can cause tiles to work loose. This is why many tilers have problems with anhydrite screeds.
Check with the adhesive manufacturer to see which primer/adhesive combination it requires.
It isn't true that anhydrite screeds will not crack. Therefore, an anti-fracture membrane may still be required, particularly if underfloor heating in included.
Wooden floorboards/joists:
Eliminate any "bounce" in the floor by strengthening joists with extra noggins. To test for bounce, put a glass of water on the floor and walk around it. Any movement in the floor will be evident from the ripples in the glass of water.
Consider using two layers of ply cross-laid (so the joins are not above one another) to further minimise any movement in the floor.
Use an anti-fracture membrane such as Mapetex or Ditra Mat to minimise the risk of cracking in the tiles and grout lines.
Mixed substrates:
Different substrates expand and contract at different rates. This will cause cracks in the tiles along the joins between the substrates. So, wherever there are mixed substrates, often seen in house extensions, use an anti-fracture membrane to cover the whole area to compensate for the movement and minimise the risk of cracking.
Underfloor Heating:
Any type of underfloor heating will cause thermal expansion and contraction which can lead to cracks in the tiled surface. Again, use an anti-fracture membrane beneath the tiles to prevent this.
Substrates to Avoid:
- plaster board, plaster skim, painted surfaces, chipboard flooring etc.
The table below lists some substrates that are often used for wall tiling and shows how much weight they can support.
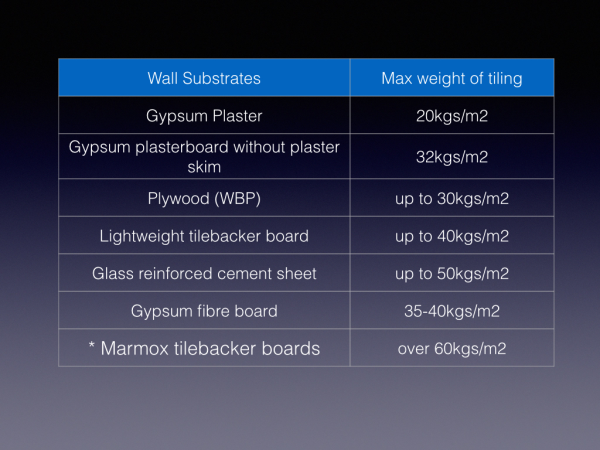
When you consider that 20mm thick marble weighs up to 60 kgs per square metre, you can see that many of the common types of wall structure are not suitable for tiling.
* I have mentioned Marmox boards specifically in the table above because I know that their boards have been tested and they are rated to hold well over 60 kgs per square metre. Other brands may be available, as they say, but I have not had those conversations with other manufacturers and therefore cannot comment on the suitablility of other specific brands of board.
I'll just add a quick note about types of substrates in wet areas such as shower enclosures and bathrooms. In short, the advice is to use a substrate which does not deform or degrade when wet. It is a common misconception that the tiles and the grout will prevent water or moisture from getting through to the substrate. However, this is not the case and, eventually, water will find a way through. Plaster, plasterboard, mdf and plywood are particulary bad substrates for wet areas. Plasterboard will swell when wet and will cause the tiles to fall off the wall. Plywood and mdf can leach its colour when wet and cause staining through to appear through marble and limestone. Also, it can cause adhesive to debond and, again, tiles will eventually fall off the wall.
So, to sum up, do NOT use plasterboard or plywood as a tiling substrate. It will lead to failures and there are plenty of case studies available to prove the point. You can read more here.
UPDATE 13/12/2015: We have been warning against using plywood as a substrate for tiling for some time. To weight to the case, the Stone Federation of Great Britain have jut released a document from the NAIS that warns of using plywood in bathrooms. You can read the full report here: http://www.stonefed.org.uk/uploads/NSAI_Plywood_warning.pdf
I hope that was helpful. If you need clarification on any of the points, please call or email. I'll be happy to hear from you.
To get the second part of this article direct to your email inbox, if you haven't done so already, sign up for our blog by entering your email address into the box at the bottom of this page.
In the next article, I'll talk more about Installation, Cleaning and Sealing and Maintenance and aftercare.
************************************
If you would like to know more about how we can help to make your natural stone project as successful as it possibly can be, please download our brochure or just phone or email for a chat. We're always happy to talk about natural stone!

Thanks for reading.
Steve
Tel: 0345 260 8070
Email: steve @ amarestone.com
P.S. we welcome your feedback and comments below. All comments are verified before being displayed on the page.